I’ve been working lately on computer vision projects, involving Tensorflow for deep learning, OpenCV for computer vision and OpenGL for computer graphics. I’m especially interested in hybrid approaches, where I mix deep learning stuff, opencv stuff, and classic OpenGL pipeline. The main idea is to avoid framing problems as black box problems, throw a neural network at it and hope for the best. The main idea is rather to do the maximum amount of work with proven technologies, and let deep learning work only on a well-defined subset of the problem.
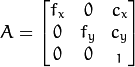
This time, I was working on an augmented reality problem, where I have an image, and I want to overlay stuff on it. In OpenCV, from an image you can estimate camera parameters, which are called “intrinsic camera parameters”. In OpenCV pinhole camera model, those parameters are: fx (horizontal focal length), fy (vertical focal length), cx (camera center X coord), cy (camera center Y coord).
This is the OpenCV camera matrix:
You want to overlay stuff on the original image. Now you have estimated the OpenCV camera parameter, you need to turn it into an OpengL projection matrix, so that you can render stuff on top of the original image using the OpenGL graphics pipeline. This problem of computing the OpenGL projection matrix from OpenCV camera matrix is NOT easy.
First of all, the OpenCV camera matrix projects vertices directly to screen coordinates. (NOTE: don’t forget to then divide by z component). OpenGL projection matrix projects vertices to clip space. The conversion from clip space to NDC (which means division by w component) is handled by OpenGL, and the conversion from NDC to screen space is handled as well by OpenGL. So the first problem is that we’re not looking at the same transformations exactly.
The second problem is that in OpenGL you usually assume that your camera center is at the origin (it’s the convention). It’s not the case in OpenCV, your camera parameters cx and cy let you have the camera center anywhere, it’s a degree of freedom like any other. 90% of the OpenGL projection matrices formulas you will find on the Internet do not account for that.
In the end, I checked many sources:
https://blog.noctua-software.com/opencv-opengl-projection-matrix.html
http://kgeorge.github.io/2014/03/08/calculating-opengl-perspective-matrix-from-opencv-intrinsic-matrix
http://ksimek.github.io/2013/06/03/calibrated_cameras_in_opengl/
https://jsantell.com/3d-projection
But the one that saved my day was this one: https://strawlab.org/2011/11/05/augmented-reality-with-OpenGL
The formula there is accurate (you can replace K with OpenCV camera matrix).
Here is a source code sample to demonstrate how you can project a point with OpenCV and OpenGL and get the same results (therefore validating your matrices):
This file contains hidden or bidirectional Unicode text that may be interpreted or compiled differently than what appears below. To review, open the file in an editor that reveals hidden Unicode characters.
Learn more about bidirectional Unicode characters
| import cv2 | |
| import numpy as np | |
| import math | |
| cx = 88 #principal point x coord | |
| cy = 109 #principal point y coord | |
| w = 178 #image width | |
| h = 218 #image height | |
| near = 10 #near plane | |
| far = 20 #far plane | |
| fovy = 45.0/360.0*2.0*np.pi #45° in radians | |
| f = 0.5 * h / math.tan(fovy/2) #cf http://paulbourke.net/miscellaneous/lens/ (NOTE: focal length is in pixels) | |
| #we compute the OpenCV camera matrix | |
| camera_mtx = np.array([ | |
| [f, 0, cx], | |
| [0., f, cy], | |
| [0.,0.,1.] | |
| ], dtype=np.float64) | |
| #we compute the corresponding opengl projection matrix | |
| #cf https://strawlab.org/2011/11/05/augmented-reality-with-OpenGL | |
| #NOTE: K00 = K11 = f, K10 = 0.0, K02 = cx, K12 = cy, K22 = 1.0 | |
| opengl_mtx = np.array([ | |
| [2*f/w, 0.0, (w – 2*cx)/w, 0.0], | |
| [0.0, -2*f/h, (h – 2*cy)/h, 0.0], | |
| [0.0, 0.0, (-far – near) / (far – near), -2.0*far*near/(far-near)], | |
| [0.0, 0.0, -1.0, 0.0] | |
| ]) | |
| #point is in opencv camera space (along Oz axis) | |
| point = np.array([1.0, 2.0, 15.0]) #Note: coords must be floats | |
| #### OpenCV projection | |
| screen_point, _ = cv2.projectPoints(np.array([point]), np.zeros(3), np.zeros(3), camera_mtx, np.zeros(5)) | |
| print(screen_point) | |
| #Note: we obtain the same result with this: (that's what cv2.projectPoints basically does: multiply points with camera matrix and then divide result by z coord) | |
| print(camera_mtx.dot(point)/point[2]) | |
| #### OpenGL projection | |
| #we flip the point z coord, because in opengl camera is oriented along -Oz axis | |
| point[2] = -point[2] | |
| point2 = np.hstack([point,1.0]) #we add vertex w coord (usually done in vertex shader before multiplying by projection matrix) | |
| #we get the point in clip space | |
| clip_point = opengl_mtx.dot(point2) | |
| #NOTE: what follows "simulates" what happens in OpenGL after the vertex shader. | |
| #This is necessary so that we can make sure our projection matrix will yield the correct result when used in OpenGL | |
| #we get the point in NDC | |
| ndc_point = clip_point / clip_point[3] | |
| #we get the screen coordinates | |
| viewport_point = (ndc_point + 1.0)/2.0 * np.array([w, h, 1.0, 1.0]) | |
| #opencv Oy convention is opposite of OpenGL so we reverse y coord | |
| viewport_point[1] = h – viewport_point[1] | |
| print(viewport_point) | |
| #Now you can see that viewport_point and screen_point have the same x/y coordinates! | |
| #This means you can now, from OpenCv camera matrix, use OpenGl to render stuff on top of the image, | |
| #thanks to the opengl projection matrix, computed from opencv camera matrix | |
| #NOTE: when near plane is small (a few units) and when focal length is small (ex: 10-12), | |
| #both results tend to diverge. I'm not sure why the formula starts falling apart at extreme values. |
Full source code can be found here: https://github.com/francoisruty/fruty_opencv-opengl-projection-matrix
When you have your OpenGL projection matrix, you can then render and overlay all the stuff you need on your image. I initially expected this step to take me 1 or 2 hours and it ended up taking me like 6 or 7 hours, so I thought I would share the solution.

Very good article!
I have a question about f = h / 2*math.tan(fovy/2)
Should be f = 0.5h / math.tan(fovy/2)?
LikeLike
you’re totally right! I fixed the code!
LikeLike